Description
This children’s polo-style jumper is knit with a decorative fantasy stitch panel combined with smooth stockinette sections. The front features a short placket with button closure, finished with a ribbed collar for a classic polo look. The sleeves are set in, with ribbed cuffs and hem, making it both practical and stylish. Designed in soft wool yarn with subtle detailing, it’s perfect for children aged 2–3 years.

Size
Child 2–3 years
Materials
- 300 g of wool yarn in gray-blue
- 3 matching buttons
- Knitting needles sizes 3.5 mm and 4 mm
Stitch Patterns
- Rib 1×1: k1, p1 alternately. On WS rows, work the stitches as they appear.
- Stockinette stitch (St st): knit RS, purl WS.
- Fantasy stitch pattern: follow chart (not included in text — substitute with any similar decorative panel if chart is unavailable).
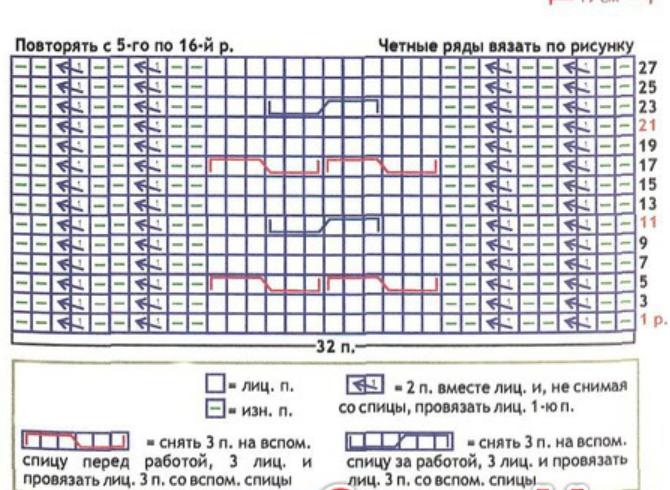
Blank square = knit st
dash = purl st
1st cable = slip 3 sts onto spare needle before work, knit 3 and knit 3 sts onto spare needle
left leaning arrow = 2 sts together knit and, without removing from the needle, knit the 1st st.
2nd cable = Slip 3 stitches onto a cable needle and hold at back of work, knit 3, then knit the 3 stitches from the cable needle.
Gauge
27 sts × 32 rows = 10 × 10 cm in pattern with 4 mm needles.
Instructions
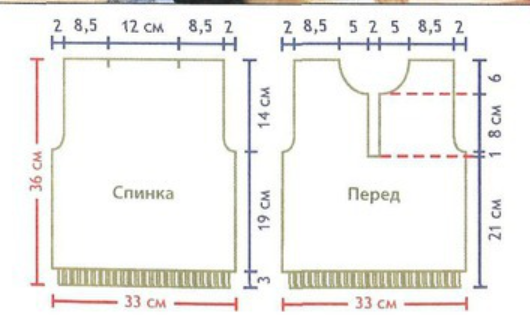
Back
- With 3.5 mm needles, cast on 83 sts and work 3 cm in 1×1 rib.
- Switch to 4 mm needles. In the first WS row, increase 6 sts evenly = 89 sts.
- Distribute stitches as follows:
- 10 sts St st,
- 32 sts fantasy stitch pattern,
- 5 sts St st,
- 32 sts fantasy stitch pattern,
- 10 sts St st.
- Work straight until piece measures 22 cm from the cast-on edge.
- For armholes, bind off 5 sts at each side = 79 sts. Continue straight.
- At a total height of 36 cm, bind off for shoulders: 23 sts each side and bind off center 33 sts for the neckline. Break yarn.
Front
- Work as for back until piece measures 21 cm.
- At this point, bind off the center 5 sts for placket opening and finish each side separately.
- At 22 cm from cast-on, shape armholes as for back.
- When armholes measure 8 cm, shape neckline: from each edge of placket, bind off in every 2nd row: 5 sts once, 3 sts twice, 2 sts once, and 1 st once.
- At a total height of 36 cm, bind off remaining 23 sts for each shoulder.
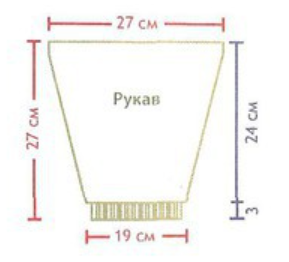
Sleeves
- With 3.5 mm needles, cast on 47 sts and work 3 cm in 1×1 rib.
- Switch to 4 mm needles. In the first WS row, increase 5 sts evenly = 52 sts.
- Work as follows:
- 10 sts St st at each side,
- center 32 sts in fantasy stitch pattern.
- At the same time, increase 1 st each side every 6th row, 10 times = 72 sts.
- When sleeve measures 27 cm total, bind off all sts.
Finishing
- Sew shoulder seams.
- Sew side seams and sleeve seams, leaving the top 2 cm of sleeve seams open.
- Set in sleeves, joining and sewing the remaining 2 cm along the sleeve tops.
Neckband:
- With 3.5 mm needles, pick up and knit 71 sts evenly around neckline.
- Work 6 rows in 1×1 rib. Bind off in rib.
Placket bands:
- Pick up and knit 27 sts along each side of the placket opening.
- Work as for neckband. On the left placket band, in the 4th row, make 3 buttonholes (work 2 sts together, YO):
- First and last buttonholes about 1 cm from each edge,
- third buttonhole centered between them.
- Bind off in rib.
- Sew buttons to right placket band opposite buttonholes.
Jersey Polo
Descripción
Este jersey infantil tipo polo se teje con un motivo fantasía combinado con secciones en punto jersey. El delantero lleva una pequeña abertura con tapeta y cierre de botones, terminada con un cuello en punto elástico para dar el aspecto clásico de polo. Las mangas son pegadas, con puños y bajo en punto elástico, lo que lo hace cómodo y elegante. Diseñado en lana suave con detalles sutiles, es perfecto para niños de 2 a 3 años.
Talla
Niño 2–3 años
Materiales
- 300 g de lana gris-azulada
- 3 botones al tono
- Agujas de tejer nº 3,5 y nº 4
Puntos empleados
- Elástico 1×1: alternar 1 p. derecho, 1 p. revés. En las vueltas del revés, tejer los puntos como se presentan.
- Punto jersey derecho: derecho en las vueltas del derecho, revés en las vueltas del revés.
- Punto fantasía: según esquema (si no se dispone del gráfico original, puede sustituirse por un motivo decorativo similar).
Muestra
27 p. × 32 v. = 10 × 10 cm con agujas nº 4 en punto fantasía.
Instrucciones
Espalda
- Con agujas nº 3,5 montar 83 p. y tejer 3 cm en p. elástico 1×1.
- Cambiar a agujas nº 4. En la 1ª v. del revés aumentar 6 p. repartidos = 89 p..
- Repartir los puntos de la siguiente forma:
- 10 p. en punto jersey,
- 32 p. en punto fantasía,
- 5 p. en punto jersey,
- 32 p. en punto fantasía,
- 10 p. en punto jersey.
- Continuar recto hasta tener 22 cm desde el inicio.
- Para las sisas, cerrar 5 p. a cada lado = 79 p.. Seguir recto.
- A los 36 cm de altura total, cerrar para los hombros 23 p. de cada lado y los 33 p. centrales para el escote.
Delantero
- Tejer igual que la espalda hasta tener 21 cm.
- Cerrar entonces los 5 p. centrales para la abertura de la tapeta y continuar cada lado por separado.
- A los 22 cm desde el inicio, formar las sisas igual que en la espalda.
- A los 8 cm de altura de sisa, comenzar el escote: desde cada borde de la abertura cerrar en cada 2ª vuelta: 5 p. 1 vez, 3 p. 2 veces, 2 p. 1 vez y 1 p. 1 vez.
- A los 36 cm de altura total, cerrar los 23 p. de cada hombro.
Mangas
- Con agujas nº 3,5 montar 47 p. y tejer 3 cm en p. elástico 1×1.
- Cambiar a agujas nº 4. En la 1ª v. del revés aumentar 5 p. = 52 p..
- Repartir:
- 10 p. en punto jersey a cada lado,
- 32 p. centrales en punto fantasía.
- Al mismo tiempo, aumentar 1 p. a cada lado cada 6ª vuelta, 10 veces = 72 p..
- A los 27 cm de altura total, cerrar todos los puntos.
Confección
- Coser las costuras de los hombros.
- Coser costados y mangas, dejando 2 cm superiores de las mangas sin cerrar.
- Montar las mangas en las sisas y unir los 2 cm restantes de las copas de las mangas.
Cuello:
- Con agujas nº 3,5 recoger 71 p. alrededor del escote.
- Tejer 6 v. en elástico 1×1 y cerrar los puntos según el punto.
Tapetas de la abertura:
- Recoger 27 p. a lo largo de cada borde de la abertura del delantero.
- Tejer igual que el cuello. En la tapeta izquierda, en la 4ª vuelta, hacer 3 ojales (2 p. juntos, 1 hebra):
- El primero y el último a 1 cm de cada borde,
- el tercero centrado entre ambos.
- Cerrar en elástico.
- Coser los botones en la tapeta derecha, enfrentados a los ojales.
Джемпер-поло
Описание
Детский джемпер-поло вяжется с узором фантазийным и участками лицевой глади. Передняя часть имеет небольшую планку с разрезом и застёжкой на пуговицы, с воротником резинкой 1×1, создающим классический вид поло. Рукава втачные, с манжетами и нижним краем резинкой, что делает изделие удобным и аккуратным. Связан мягкой пряжей, идеально подходит для детей 2–3 лет.
Размер
2–3 года
Материалы
- 300 г серо-голубой шерсти
- 3 пуговицы в тон
- Спицы № 3,5 и № 4
Плотность вязания
27 п. × 32 р. = 10 × 10 см (узор фантазийный, спицы № 4)
Плотность и узоры
- Резинка 1×1: чередовать 1 лиц., 1 изн. В изнаночных рядах вязать петли по рисунку.
- Лицевая гладь: лицевые петли в лицевых рядах, изнаночные – в изнаночных рядах.
- Фантазийный узор: по схеме (можно заменить любым декоративным мотивом, если схемы нет).
Инструкция по вязанию
Спинка
- На спицы № 3,5 набрать 83 п. и связать 3 см резинкой 1×1.
- Перейти на спицы № 4. В 1-м изн. ряду равномерно прибавить 6 п. = 89 п.
- Распределить петли:
- 10 п. лицевой глади,
- 32 п. узора,
- 5 п. лицевой глади,
- 32 п. узора,
- 10 п. лицевой глади.
- Продолжать вязание прямо до 22 см от начала.
- Для пройм закрыть по 5 п. с каждой стороны = 79 п.
- Вязать прямо.
- На общей высоте 36 см закрыть по 23 п. для каждого плеча и 33 п. для горловины.
Перед
- Вязать как спинку до 21 см.
- Закрыть 5 центральных петель для разреза планки, вязать стороны раздельно.
- На 22 см от начала сделать проймы как на спинке.
- На 8 см от начала пройм начать вырез горловины: с каждой стороны разреза в каждом 2-м ряду закрыть: 5 п. 1 раз, 3 п. 2 раза, 2 п. 1 раз, 1 п. 1 раз.
- На высоте 36 см закрыть по 23 п. для каждого плеча.
Рукава
- На спицы № 3,5 набрать 47 п. и связать 3 см резинкой 1×1.
- Перейти на спицы № 4. В 1-м изн. ряду равномерно прибавить 5 п. = 52 п.
- Распределить петли:
- по 10 п. лицевой глади с каждого края,
- 32 п. узора посередине.
- Одновременно прибавлять с обеих сторон по 1 п. каждые 6 рядов, 10 раз = 72 п.
- На общей высоте 27 см закрыть все петли.
Сборка
- Выполнить плечевые швы.
- Выполнить боковые швы и швы рукавов, оставив открытыми верхние 2 см рукавов.
- Вшить рукава в проймы, соединив и зашив оставшиеся 2 см.
Воротник:
- На круговые спицы № 3,5 набрать 71 п. по краю горловины.
- Связать 6 рядов резинкой 1×1 и закрыть петли по рисунку.
Планка разреза:
- По краям разреза набрать по 27 п. и вязать как воротник.
- На левой планке на 4-м ряду сделать 3 отверстия для пуговиц (2 п. вместе, 1 накид):
- Первое и второе – примерно в 1 см от края,
- Третье – между ними.
- Пришить пуговицы на правую планку.
Leave a Reply