Delicate, soft, and timeless — this lace baby cardigan and matching bonnet make the perfect set for a newborn. Knitted with lightweight cotton yarn, this outfit is gentle on a baby’s skin and breathable for comfort. The cardigan features a charming lace stitch pattern, shaped fronts with tie closures, and neat crochet edging. The matching bonnet is worked in the same lace design, finished with a decorative edging and a simple drawstring cord for a snug fit.
This set is perfect for christenings, coming-home outfits, or as a handmade heirloom gift.

Size
0–3 months
Materials
- 75 g Mondial Cotton Soft Speciale Baby (100% cotton; 180 m/50 g) for cardigan
- 25 g Mondial Cotton Soft Speciale Baby for bonnet
- Straight needles size 2 mm
- Crochet hook size 2 mm
- Yarn needle for finishing
Gauge
25 stitches × 32 rows = 10 × 10 cm (4 × 4 in) in lace pattern
NOTE: This is a translation from a Russian pattern.
Stitch Pattern
Lace pattern: Work according to the chart. Only right-side rows are shown; on wrong-side rows, work stitches as they appear, knitting yarn overs as purl stitches.
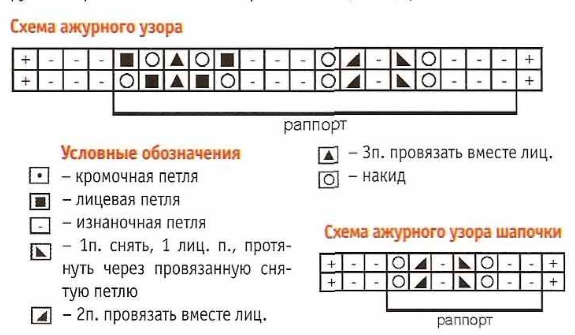
Symbols:
- • – кромочная петля (edge stitch)
- ■ – лицевая петля (knit stitch)
- □ – изнаночная петля (purl stitch)
- ▲ – 1п. снять, 1 лиц. п., протянуть через провязанную снятую петлю (slip 1 stitch, knit 1 stitch, pass slipped stitch over knitted stitch)
- ▲ – 2п. провязать вместе лиц. (knit 2 stitches together)
- The triangle symbol (▲) represents “knit two together” (Зп. провязать вместе лиц.)
- The circle symbol (○) represents “yarn over” (накид)
Cardigan
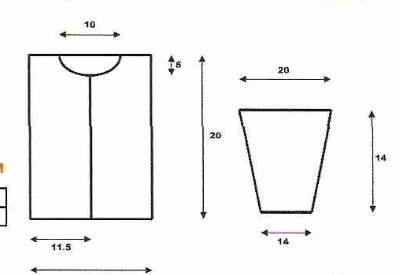
Back
- Cast on 61 sts with needles size 2 mm.
- Work in lace pattern.
- When 15 lace repeats in height are complete, bind off all stitches at once.
Left Front
- Cast on 21 sts with needles size 2 mm.
- Work in lace pattern.
- For the curved inner edge, increase 1 st every 2nd row.
- After 3 lace repeats in height, stop increasing and work straight.
- End rows with half of the lace motif: instead of “slip 1, knit 2 together, pass slipped stitch over,” work k2tog (leaning left or right as needed), followed by 3 sts in reverse stockinette.
- Work 10 lace repeats straight, then begin shaping the neckline: bind off 7 sts at the neck edge, then 1 st every 2nd row 3 times.
- At 15 lace repeats from the beginning, bind off remaining shoulder stitches.
Right Front
Work as left front, but mirrored.
Sleeves
- Cast on 45 sts with needles size 2 mm.
- Work in lace pattern.
- For sleeve shaping, increase 1 st at each side every 6th row, incorporating new stitches into the lace pattern.
- When sleeve measures 14 cm, bind off all stitches at once.
Finishing
- Block all pieces to measurements, lightly dampen, and let dry.
- Sew shoulder and side seams.
- Crochet around the sleeve edges and the entire cardigan with:
- 1 round of single crochet
- 1 round of reverse single crochet (crab stitch).
- Work two pairs of ties along the front edges for fastening.
Bonnet
Head circumference
Approx. 37 cm
Instructions
- Cast on 93 sts with needles size 2 mm.
- Work in lace pattern, starting and ending with 1 purl stitch.
- When piece measures 25 cm in height, bind off all stitches at once.
Finishing
- Sew back seam.
- Crochet edge with 1 round of reverse single crochet.
- Make a braid or cord, thread it through the lace holes at desired height, and tighten to shape the bonnet.
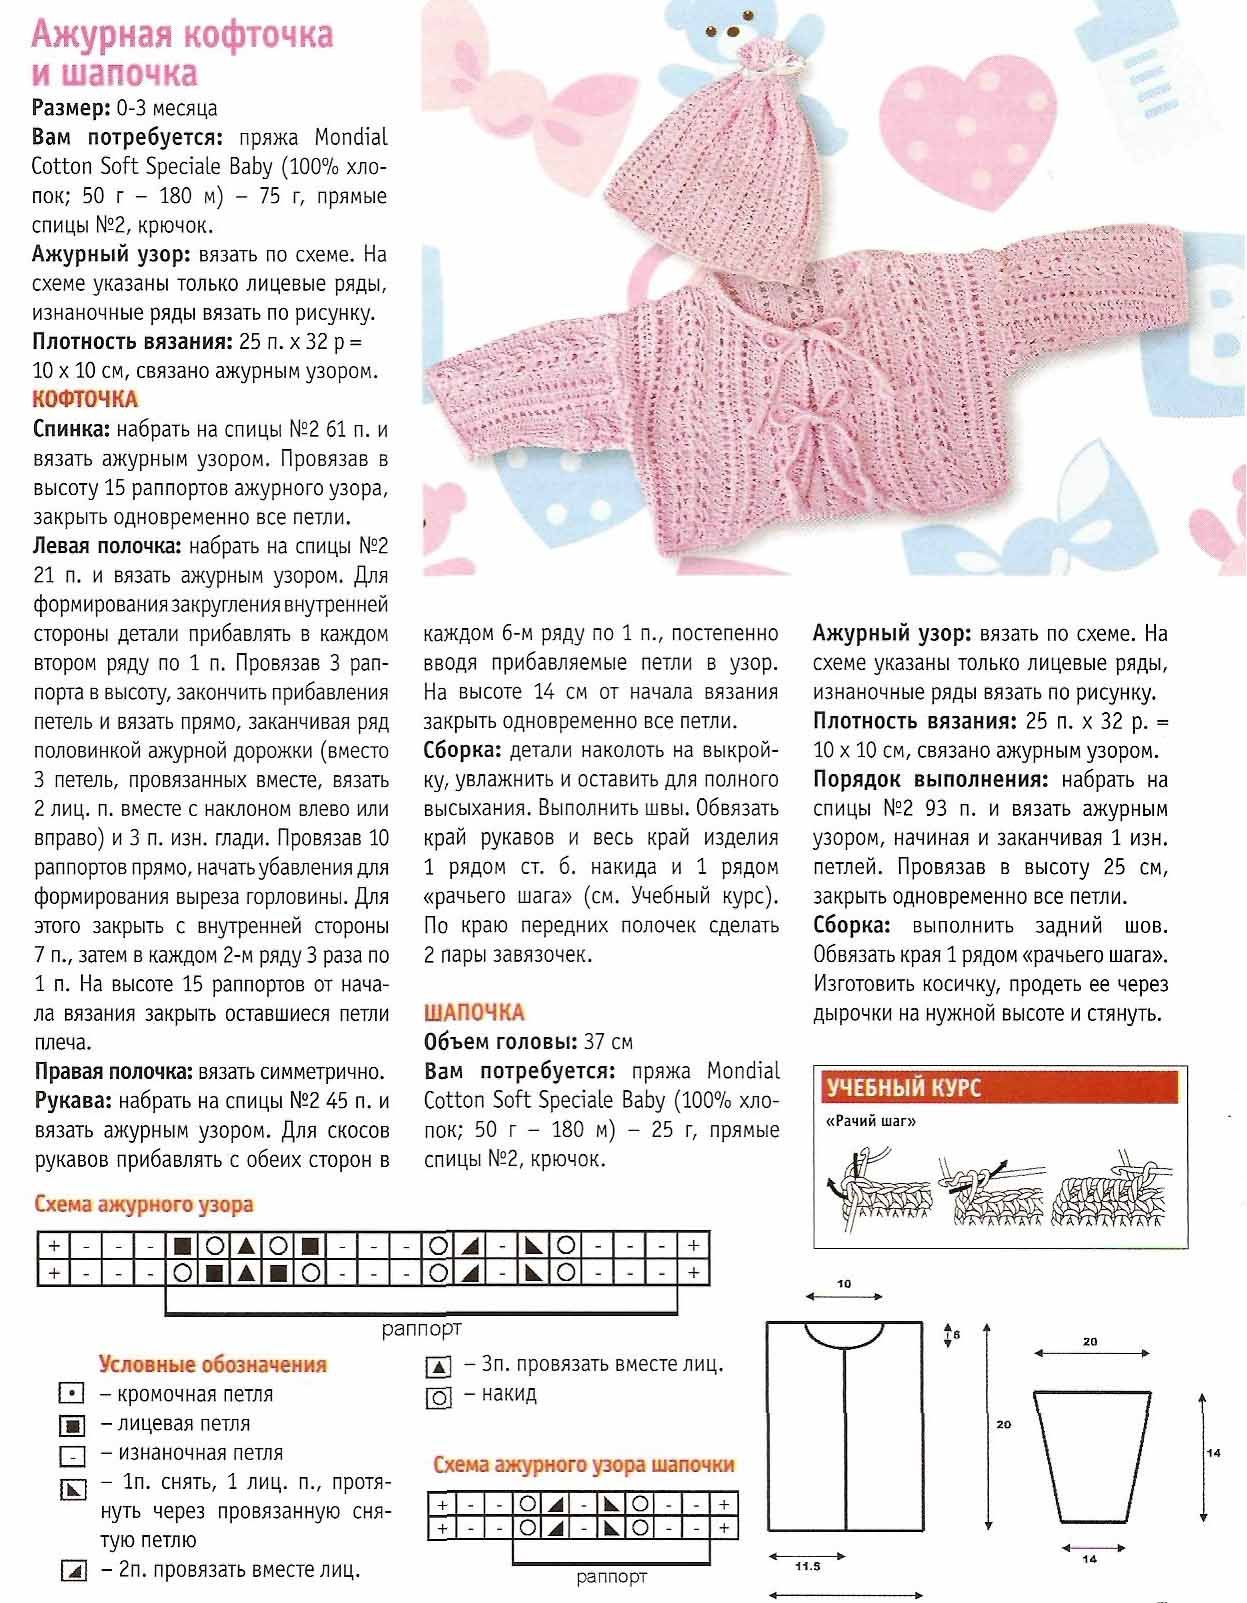
Бесплатное описание вязания: Детский хлопковый кардиган (на 3 и 5 лет)
Милый детский кардиган связан из мягкой хлопковой пряжи с красивыми ажурными и текстурными узорами. В работе используются полая резинка, лицевая гладь и декоративные ажурные панели, которые придают модели лёгкость и изящество. Кардиган идеально подойдёт для весны и лета. Изделие вяжется отдельными деталями, затем сшивается, планки застёжки выполняются полой резинкой.
Размеры
- 3 года (5 лет)
Материалы
- 150 (200) г пряжи Sesia Baby (100% хлопок, 178 м / 50 г)
- Спицы № 2,5 мм
- Крючок № 1,5 мм
- Пуговицы для застёжки
Плотность вязания
31 п. = 10 см лицевой гладью
Узор
Полая резинка: вязать по описанию.
Лицевая гладь: лицевые ряды – лицевые петли, изнаночные ряды – изнаночные петли.
Узор A (ажурная полоса):
- 1, 3, 5, 7 ряды: 2 лиц., накид, 1 п. снять, 2 п. вместе лиц., протянуть снятую петлю через провязанные, накид, 2 лиц. – повторять.
- 2, 4, 6, 8 ряды: все петли лицевые.
Узор B:
Вяжется по схеме. В чётных рядах, не указанных в схеме, все петли и накиды вязать изнаночными.
Узор C:
- 1–12 ряды: 11 п. узором B (ряды 1–12, от A до C), 11 п. лиц. гладью – повторить 3 раза для спинки. Закончить 11 п. узором B.
- 13–18 ряды: лицевая гладь.
- 19–30 ряды: 11 п. лицевой гладью, 11 п. узором B (ряды 1–12, от A до C ×3), 11 п. лицевой гладью.
- 31–36 ряды: лицевая гладь.
- 37 ряд: повторять с 1-го ряда.
Описание работы
Правая полочка
Контрастной нитью набрать 44 (49) п. и провязать 1 ряд лицевыми (этот ряд потом срезать). Перейти на основную нить:
- 1 ряд изнаночными, затем 4 ряда полой резинкой.
- Далее: 1 (0) п. лиц. гладью, 43 (49) п. узором A.
- После 8-го ряда узора A продолжить вязать лицевой гладью (для размера 5 убавить 1 п. слева в первом ряду).
На высоте 9 (11) см распределить петли: 3 п. лиц. гладью, 17 п. узором B, остальные петли – лиц. гладью.
Продолжать по рисунку и выполнять убавки:
- На высоте 14,5 (16,5) см закрыть слева 3 п. для проймы, затем убавить по 1 п. в каждом 2-м ряду 5 (6) раз.
- На высоте 22 (24) см начать формировать вырез горловины: закрыть справа 5 п., затем 3 п., затем 2 п., затем 5 (7) раз по 1 п. в каждом 2-м ряду.
- Плечо: на высоте 26 (29) см закрыть оставшиеся 21 (22) п. в 3 приёма (7+7+7 или 8+7+7).
Левая полочка
Вязать симметрично правой.
Спинка
Набрать 85 (93) п. Связать край так же, как у полочек. Далее:
- 8 рядов узором A, затем 6 рядов лиц. гладью.
- Распределить петли: 4 (8) п. лиц. глади, 77 п. узором C, 4 (8) п. лиц. глади.
На высоте 14,5 (16,5) см для пройм закрыть с обеих сторон по 3 п., затем убавить по 1 п. в каждом 2-м ряду 5 (6) раз.
На высоте 26 (29) см для плеч закрыть с обеих сторон по 21 (22) п. в 3 приёма. Закрыть средние 27 (31) п. для выреза горловины.
Рукава
Набрать 49 п. Связать край так же, как у полочек. Далее 8 рядов узором A, затем лиц. гладью.
После 6 рядов распределить: 19 п. лиц. глади, 11 п. узором B (ряды 1–12, от A до C), 19 п. лиц. глади.
На высоте 4 (5) см начать прибавки: прибавлять по 1 п. с обеих сторон 7 (10) раз, выполняя их через 10-й (8-й) ряд и через 8-й (6-й) ряд поочерёдно.
На высоте 20 (23) см оформить окат рукава: закрыть с обеих сторон по 3 п., затем убавлять по 1 п. в каждом 2-м ряду 16 (18) раз.
На высоте 28 (32) см закрыть оставшиеся 25 (27) п.
Сборка и отделка
- По вертикальным краям полочек связать планки: 4 ряда полой резинкой.
- Поднять петли по вырезу горловины и связать воротник полой резинкой.
- Выполнить плечевые, боковые швы и швы рукавов. Вшить рукава.
- Крючком выполнить петельки для пуговиц: прикрепить нить соединительным столбиком, связать 8 возд. п., закрепить через 2 п. основы полустолбиком. Повторить для всех петель.
- Пришить пуговицы.
✨ Кардиган получается лёгким, воздушным и аккуратным, с ажурными панелями и мягкими планками. Отличный подарок, связанный своими руками для ребёнка!
Chaqueta calada y gorrito de bebé (0–3 meses)
Descripción
Un conjunto delicado y aireado para recién nacidos: una chaqueta calada con cordones de amarre y un gorrito a juego. Tejido con un algodón suave, es ideal para los primeros meses de vida del bebé. El patrón calado hace que la prenda sea transpirable y cómoda, mientras que el borde tejido a ganchillo le da un acabado elegante.
Este conjunto es perfecto para bautizos, la salida del hospital o como un regalo hecho a mano que se convertirá en un recuerdo familiar.
Talla
0–3 meses
Materiales
- 75 g de hilo Mondial Cotton Soft Speciale Baby (100% algodón, 180 m/50 g) — para la chaqueta
- 25 g del mismo hilo — para el gorrito
- Agujas rectas de 2 mm
- Ganchillo de 2 mm
- Aguja lanera para costuras
Muestra
25 puntos × 32 vueltas = 10 × 10 cm en punto calado
Punto calado
Tejer siguiendo el esquema. El gráfico muestra solo las vueltas del derecho; en las vueltas del revés, tejer los puntos como se presentan, los calados (lazadas) se trabajan del revés.
Chaqueta
Espalda
- Montar 61 pts en agujas de 2 mm.
- Tejer en punto calado.
- Después de 15 repeticiones del motivo en altura, cerrar todos los puntos a la vez.
Delantero izquierdo
- Montar 21 pts en agujas de 2 mm.
- Tejer en punto calado.
- Para dar forma al borde interior, aumentar 1 punto en cada 2ª vuelta.
- Tras 3 repeticiones del motivo en altura, dejar de aumentar y continuar recto.
- Terminar las vueltas con media repetición del motivo: en lugar de tejer 3 puntos juntos, tejer 2 puntos juntos al derecho (con inclinación hacia la izquierda o derecha) y 3 puntos en punto jersey revés.
- Continuar recto hasta completar 10 repeticiones.
- Comenzar el escote: cerrar 7 pts en el borde interior, luego 1 punto en cada 2ª vuelta, 3 veces.
- A los 15 motivos en altura, cerrar los puntos restantes del hombro.
Delantero derecho
Trabajar simétricamente al delantero izquierdo.
Mangas
- Montar 45 pts en agujas de 2 mm.
- Tejer en punto calado.
- Aumentar 1 punto a cada lado cada 6ª vuelta, incorporando los puntos aumentados al motivo calado.
- Cuando la manga mida 14 cm, cerrar todos los puntos a la vez.
Montaje
- Bloquear todas las piezas, humedecer ligeramente y dejar secar.
- Coser hombros, costados y mangas.
- Con ganchillo, tejer alrededor de mangas y todo el borde de la chaqueta:
- 1 vuelta de punto bajo
- 1 vuelta de punto cangrejo (punto bajo tejido de izquierda a derecha).
- Hacer dos pares de cordones en los delanteros para atar.
Gorrito
Contorno de cabeza
Aprox. 37 cm
Instrucciones
- Montar 93 pts en agujas de 2 mm.
- Tejer en punto calado, empezando y terminando con 1 punto del revés.
- Cuando mida 25 cm, cerrar todos los puntos a la vez.
Montaje
- Coser la costura trasera.
- Hacer una vuelta de punto cangrejo en todo el borde.
- Hacer una trenza o cordón, pasarlo por los calados a la altura deseada y ajustar.
✨ Este conjunto de chaqueta y gorrito calados es un proyecto perfecto para regalar o conservar como una prenda de recuerdo hecha a mano.
Leave a Reply