Smocking knitting technique for beginners.
Knitting a background for smocking
Smocking is a technique normally used in dressmaking to control fullness in a fabric: similar techniques applied to knitting are particularly successful since knitted fabrics are naturally elastic. Garments knitted in fine yarns lend themselves to smocking those made of thick yarns are too bulky. A ribbed fabric is a perfect background for smocking, as the vertical knit ribs serve as a guide for the stitching. The most popular background is single knit ribs with three stitches between them. To make a fabric of the required width after smocking you must first knit one measuring one and a half times the finished width. Specific details, including the number of stitches, normally appear in a pattern. The following steps can be used in working your own design for a smocked panel for a bodice, yoke or cuffs on a dress or blouse.
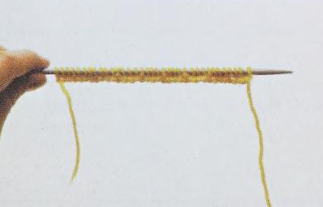
Step 1:
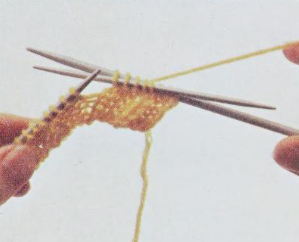
1 Make a tension sample to calculate the number of stitches required. Cast on a multiple of 8 stitches (e.g. 16. 24, 32) plus 3 extra stitches. Try 35 stitches for double knitting yarn. To work the row (this is the right side of the fabric). P3 sts. K1 st alternately until 3 sts remain, P3,
Step 2:
To work the 2nd row K3 sts, then P1 st alternately until 3 sts remain, K3. The wrong side of the work is facing you.
Step 3:
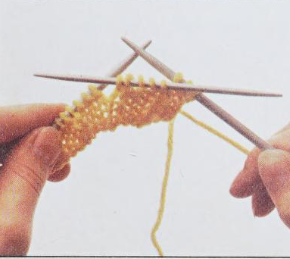
Repeat the 2 pattern rows until the fabric is about 6cm deep, ending with a 2nd row.
Step 4:
Cast off, keeping the rib sequence correct.
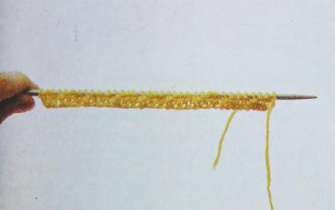
Step 5:
Pin the sample down and measure 10cm across the centre. Count the number of stitches to 10cm: on our sample it is 25.

Step 6
Calculate the number of stitches to cast on. For example, if you want the completed work to measure 40cm across, you would use the figures given here to determine the number of cast-on stitches.
Step 7
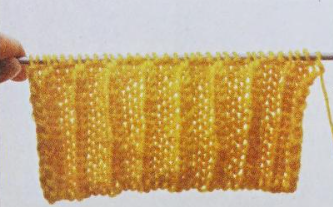
Cast on the necessary number of stitches and make the background fabric the depth you require. The vertical ribs are an ideal guide for the smocking.
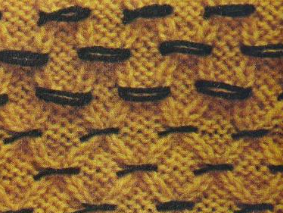
Smocking a knitted fabric
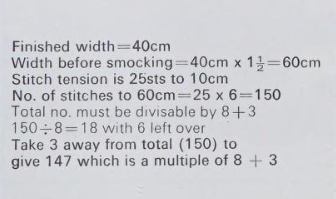
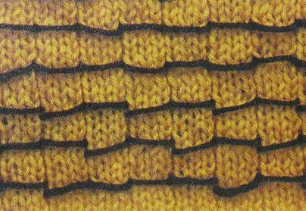
After the background fabric is complete, work horizontal lines of stitching across it using a contrasting coloured varn of the same quality. The stitching draws pairs of ribs together across the fabric: their position alternates on every other row to form the characteristic honeycomb effect.
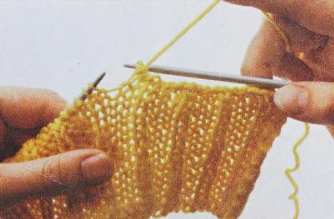
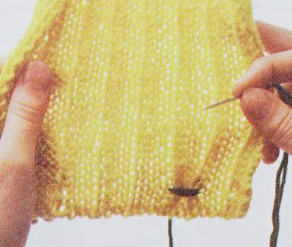
Step 1
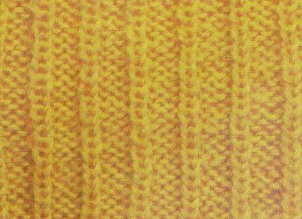
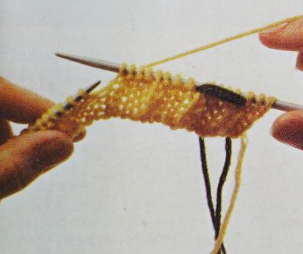
To work the 1st row, first locate the stitch on the 2nd rib from RH edge in the 4th row. Thread a blunt-ended wool needle with the smocking thread: secure with 2 or 3 small stitches, one on top of another, on the wrong side.
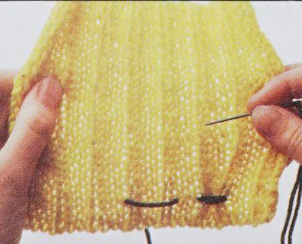
Step 2:
Bring needle from back to front just before the 2nd knit rib: reinsert from front to back after 3rd knit rib. The strand of yarn covers 5 stitches – 2 knit ribs and 3 purl stitches between them.
Step 3:
Wind yarn once or twice round the stitches again, finishing with the needle at the back. Pull yarn gently, drawing the ribs together.
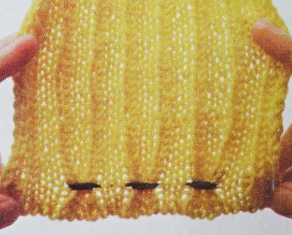
Step 4:
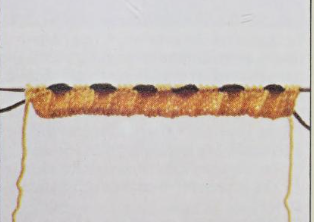
Carrying yarn across back of work, bring needle from back to front immediately before the next knit rib to the left. Miss this rib, 3 purl stitches and following rib; reinsert needle from front to back.
Step 5:
Continue in this way, winding yarn round pairs of ribs and drawing them together until 1st row is complete.
Fasten off.
Step 6:
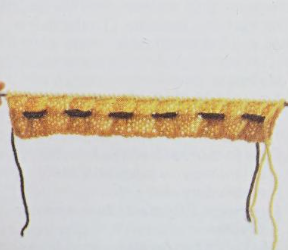
To work 2nd row, first miss 4 rows; rejoin yarn behind 1 st rib at RH edge. Bring needle from back to front just before the 1 st rib; reinsert from front to back after 2nd rib (i.e. 1st rib of 1 st pair drawn together on previous row).

Step 7:
Wind yarn round the stitches again. finishing with the needle at the back. Pull yarn gently drawing the ribs togethe Continue in the same way as on the previous row, always taking LH rib of pair below together with RH rib of the next pair.
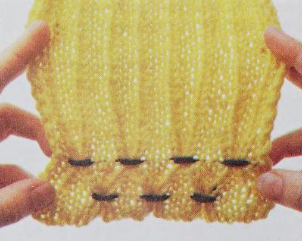
Step 8:
Always missing 4 rows between lines of smocking, work 1st and 2nd rows alternately for the depth you require. The lines of stitching draw the ribs together into a textured honeycomb pattern.

Knitting in smocking
Rather than applying smocking after the background is complete, you can add it simultaneously when working the back-ground. Use a cable needle to hold the stitches to be drawn together separate from the remainder of the work whilst you wind the smocking thread round them. Keep the strands of yarn threaded loosely across the wrong side of the background; draw them up when you have finished all the rows of smocking.
Step 1:
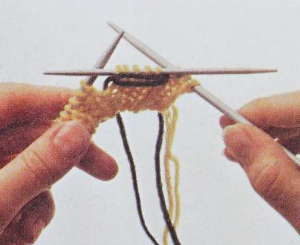
Cast on a multiple of 8 stitches (e.g. 16. 24. 32) plus 3 extra stitches. Work 4 rows in rib (see steps 1 and 2 of ‘knitting a background for smocking’).
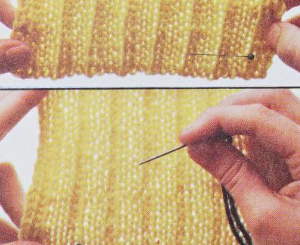
To work the 1st row of smocking, knit the first 8 stitches in pattern. Take a cable needle and insert it from left to right through the front of the last 5 sts.
Step 2:
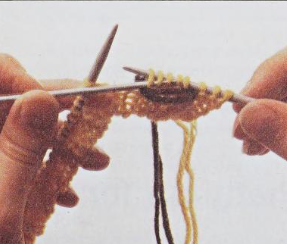
Withdraw the RH needle from the stitches on the cable needle. Position the cable needle at the front of the work with RH and LH needles behind it.
Step 3:
Take the yarn for smocking, leaving a 10cm end, from the back of the work to the front between the RH needle and cable needle.

Step 4:
Use your right hand to wind the yarn for smocking twice round the front of the 5 stitches on the cable needle in a clockwise direction. Leave the yarn at the back of the work.
Step 5:
Insert the RH needle from right to left through the stitches on the cable needle. Withdraw the cable needle returning the 5 stitches to the RH needle.
Step 6:
Leaving the smocking yarn at the back of the work, pattern another 8 stitches of background. Draw the ribs together at a later stage.
Step 7:
Repeat these steps threading the smocking yarn across the back of the work until you reach the end of the row. Cut off the smocking yarn leaving a 10cm end.
Step 8:
Pattern 3 rows: you can vary the
number of rows between smocking as long as it is uneven (3. 5. 7). The right side of the work faces you as you start the 2nd smocking row.
Step 9:
To work the 2nd smocking row pattern 12 stitches before slipping the last 5 stitches worked on to a cable needle and winding round the smocking yarn as before. Note that 1 knit rib at each end is left unworked and the smocked stitches alternate with those in the 1st row.

Step 10:
Continue in pattern with smocking rows (alternate 1st and 2nd smocking rows) at regular intervals until the fabric is the depth you require. Work 3 rows clear after last smocking row. Cast off in ribbed pattern.
Step 11:
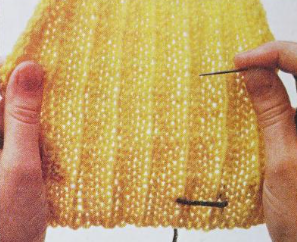
Draw up each row of smocking:
secure the smocking yarn on the back of the work at one edge. Gently pull the ribs together individually before securing at the opposite edge.
Leave a Reply