Stop dreading the final step. Finishing a hand-knit or machine-knit sweater is easier than you think—and far less intimidating than the techniques you already mastered to knit the pieces. With three core stitches, the right tools, and a little patience, you can turn stacked panels into a garment you’re proud to wear.
Why Finishing Matters (And Why It’s Not as Hard as You Think)
It’s common to lose steam once the front, back, and sleeves are complete. Pieces sit in project bags for weeks. Some knitters even pay their local yarn shop to finish the job. But here’s the truth: poor finishing ruins good knitting, but good finishing is a learnable skill. The gap between “homemade” and “handmade” is almost always in the seams and blocking.
Whether you knit by hand or machine, the finishing process is essentially the same—and the results are identical. The key is to plan ahead, practice on swatches, and work methodically.
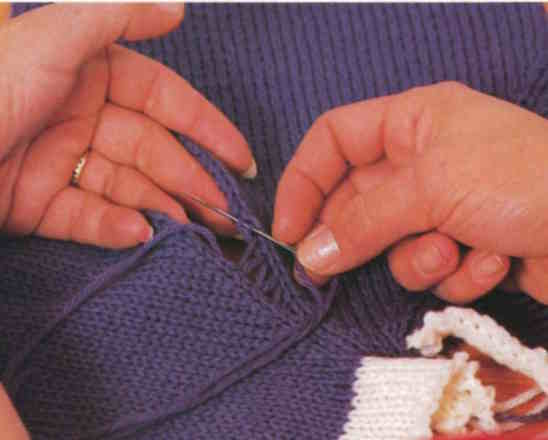
Planning Ahead: Gauge, Care & Shaping
Before you cast on, your finishing strategy should already be decided.
Gauge & Care: Test Your Swatch Like It’s the Final Garment
Knit a gauge swatch large enough to measure accurately. Do not round off or stretch the measurement. If 20 stitches measure 5.25 inches, your gauge is 3.8 stitches per inch—record it precisely.
| If your sweater will be… | Treat your swatch like this |
|---|---|
| Machine-washed & dried (cottons, synthetics) | Throw the swatch in the washer and dryer before measuring |
| Hand-washed & dried flat (wool, wool-rayon blends) | Wash, block, and steam the swatch exactly as you will the garment |
| Dry-cleaned | Steam-block the swatch to flatten edges before assembly |
Critical care rules:
- Check the yarn label for heat tolerance—many synthetics can’t handle iron or steamer heat.
- Measure shrinkage with before-and-after dimensions.
- Never wash wool in hot water and rinse in cold. Extreme temperature shifts felt wool fibers and shrink the fabric permanently.
- Some wools are spun to “bloom” (fluff up) when washed; cottons often shrink temporarily. Account for this in your gauge.
Shaping: Choose Increases, Decreases & Bind-Offs With Seaming in Mind
The edges you create while knitting determine how easy your finishing will be.
| Shaping Technique | Best For | Finishing Benefit |
|---|---|---|
| Full-fashioned increases/decreases | Most garments | Made several stitches from the edge, leaving a constant edge stitch—smoother and easier to seam |
| Edge increases/decreases | Textured or patterned stitches | Easier to manage within the pattern, but edges are less uniform |
| Short-row shaping | Shoulders, curved areas | Eliminates stair-step edges for smoother seams |
Pro tip: Whenever possible, construct seams from live stitches rather than bound-off edges. Live stitches eliminate bulk and create a flatter seam. Handknitters hold live stitches on stitch holders; machine knitters use waste knitting (scrap knitting) to keep stitches active.
Planning Edge Stitches
Read through your pattern before you start knitting. If your garment has ribbing, plan to have a knit stitch on each edge when you cast on—this makes seaming the ribbing much neater. Most patterns include finishing suggestions; combine those with the methods below to anticipate problems before they happen.
Tools You’ll Need
| Tool | Purpose |
|---|---|
| Blunt metal tapestry needle | Seaming with yarn; eye should be just large enough for your yarn to thread through |
| Crochet hook | Slipstitch crochet seams, weaving in ends, picking up stitches |
| Long straight pins | Quilting pins with colored plastic tips work best for blocking and holding pieces together |
| Tape measure | Checking gauge and finished measurements |
| Blocking wires (Magic Wands) | Thread through edges for smooth, flute-free blocking; pin only at the ends |
| Yarn for seaming | Ideally the same yarn you knit with; if too textured, use a smoother yarn of the same fiber content |
A Basic Assembly Method: Set-In Sleeves & Round Neck
This walkthrough covers a classic round-neck sweater with set-in sleeves.
Step 1: Prepare Your Pieces
To block or not to block before assembly? It depends.
| Fiber / Situation | Recommendation |
|---|---|
| Wool that will bloom or felt | Assemble first, then wash and block the whole garment |
| Cottons prone to shrinkage | Assemble first, then block |
| Edges that curl excessively | Block pieces first to make them manageable |
| Handknits (less uniform than machine knits) | Often benefit from corrective blocking before assembly |
How to wash and block: Gently hand-wash in mild detergent. Do not lift dripping-wet sweaters—they’ll stretch. Instead, spin out excess water by placing the garment in a washing machine with dry towels and running a spin-only cycle. Lay flat on dry towels, pat to finished measurements, and pin in place. Alternatively, pin to size and steam thoroughly (do not iron).
Step 2: Seam the First Shoulder
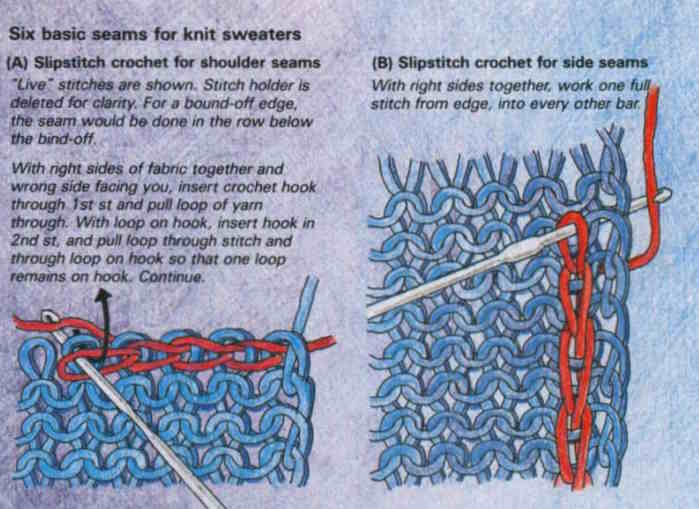
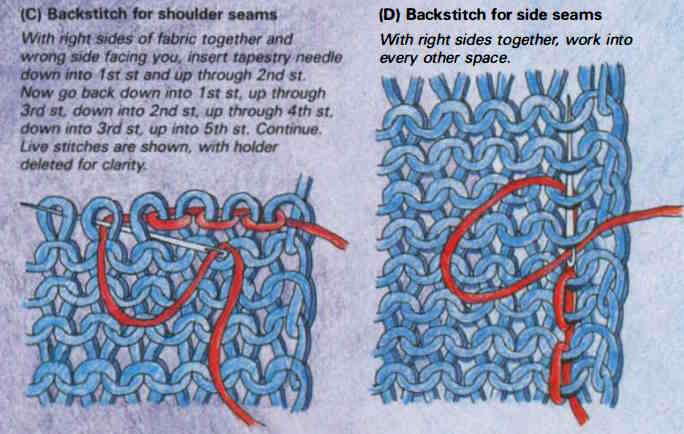
With right sides together, pin and complete one shoulder seam. Use either:
- Slipstitch crochet — preferred by many machine knitters working off live stitches held in waste knitting
- Backstitch — often easier for handknitters working from stitch holders
Both produce a firm seam that supports the sleeves without stretching. Avoid single crochet—it’s too bulky.
Yarn management: Do not knot tails. If you left a long enough tail at the start of your knitting, use it to begin the seam. When it runs out, start a new length of yarn, leaving at least a 5-inch tail to weave in later. It’s better to join fresh yarn than to fight a long strand pulled through every stitch. For crochet seaming, work directly off the ball or cone.
See free sweater knitting patterns
Step 3: Knit the Neckband (Straight Needles / Machine)
If you prefer to work ribbing back and forth on straight needles (or on the machine), now is the time to knit the neckband.
- Return any front or back neckline stitches from holders or scrap knitting onto the needles.
- Along the vertical selvage edges of the front neckline, pick up (or hang) stitches to reach the required neckband stitch count.
- If you bound off the neck stitches instead, pick up all the neck-edge stitches.
- Knit the neckband to the pattern’s specifications.
Step 4: Complete the Second Shoulder & Join Neckband Ends
Complete the second shoulder seam the same way as the first, working toward the neck. Join the ends of the neckband.
For circular-needle knitters: Wait until both shoulder seams are complete, then knit the neckband on circular needles before adding the weight of the sleeves.
Step 5: Set In the Sleeves
Once shoulders and neckband are done, you have two options:
| Method | Best For | Notes |
|---|---|---|
| Side seams first, then sleeves | Experienced knitters | Preferred by some for personal workflow |
| Sleeves first, then side seams | Beginners | Easier to align sleeve caps to armholes before closing the sides |
Recommended beginner method:
- Pin the sleeve cap to the armhole with right sides together.
- Seam using backstitch or slipstitch crochet, always working one stitch from the edge.
- Repeat for the second sleeve.
Step 6: Construct Underarm & Side Seams
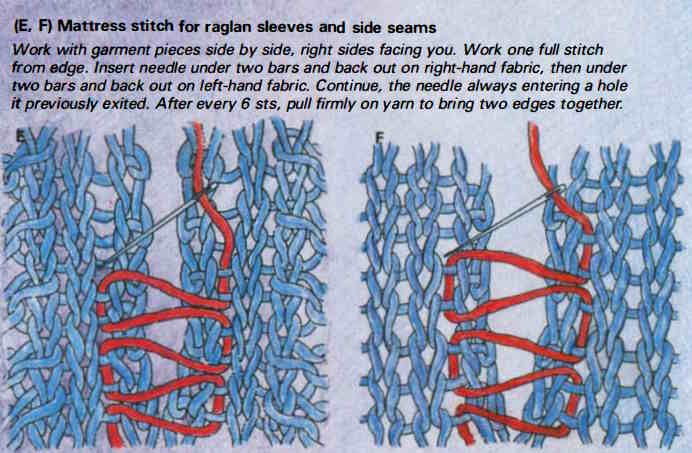
Use slipstitch crochet, backstitch, or mattress stitch (also called weaving, invisible seaming, or vertical grafting).
| Seam Type | Best Used On | Notes |
|---|---|---|
| Mattress stitch | Knit stitches, stockinette | Easiest with right sides facing you; invisible result |
| Backstitch | Purl or textured stitches | Very strong |
| Slipstitch crochet | Purl or textured stitches | Fastest method |
Important: Do not work one continuous seam from hip to cuff. Instead:
- Seam from hip to armhole
- Seam from cuff to armhole
This two-part approach lets you ease in any discrepancies invisibly at the underarm.
Finishing Raglan Sweaters
Raglan finishing follows the same principles as set-in sleeves, with one key difference: you have three raglan-shoulder seams to close before knitting the neckband.
- Mattress stitch is ideal for full-fashioned raglan edges. Work it with right sides facing.
- If working on straight needles or the machine, leave one back seam open until after the neckband is knit. Close it last.
- If knitting a circular neckband, close all four raglan seams first.
Finishing Cardigans
Cardigans require a slightly different order of operations:
- Complete all seams first (shoulders, sides, sleeves).
- Make the front bands. Options include:
- Crocheting directly onto front edges
- Knitting horizontally off the front edges
- Knitting separate vertical bands, then attaching them
| Band Attachment Method | Speed | Neatness |
|---|---|---|
| Slipstitch crochet | Fastest | Good |
| Backstitch | Moderate | Good |
| Mattress stitch | Slower | Neatest |
Band sizing tip: Knit separate bands to the finished center-front measurement given in your pattern. Do not measure your actual front edges—they usually stretch during knitting and will give you an inaccurate length.
Buttonholes: Knit or crochet them as you work the band, or machine-stitch them later. Always test your method on a swatch first.
- Pick up neckline stitches (making stitches where necessary) and knit the neckband last.
Weaving In Ends & Adding Elastic
Weaving In Yarn Tails
- Weave all yarn ends into the nearest seam whenever possible.
- For ends shorter than 5 inches, use a crochet hook.
- For tails not near seams (from colorwork or pattern stitches), use duplicate stitch or thread them into the back of the stitches with a tapestry needle.
When to Use Elastic in Ribbing
Some synthetics and cottons lack “memory”—they won’t snap back into shape. If your ribbing is prone to stretching out, elastic can help.
| Elastic Method | How It Works | Drawbacks |
|---|---|---|
| Thread cotton-covered elastic (e.g., Rainbow brand) through the cast-on edge | Simple, hidden | Only reinforces edge |
| Crochet elastic across the inside of ribbing, catching only knit stitches | Reinforces full band | Slightly more visible inside |
| Knit with clear elastic thread | Added during knitting | Changes yarn appearance; may pop with wear |
Important: Elastic is a reminder for the ribbing, not a fix for loose knitting. It should support, not replace, good tension.
Final Blocking & Care
There are two schools of thought on blocking: before assembly or after. The best choice depends on your yarn and garment style.
| Approach | Best For | Why |
|---|---|---|
| Block pieces first | Curly edges, handknits needing correction | Makes pieces flat and manageable |
| Assemble first, then block | Wools that bloom, cottons that shrink | Easier to work from live stitches; whole garment blocks evenly |
Blocking Tips for a Professional Finish
- Use blocking wires (Magic Wands) threaded through edges instead of pinning every few inches. This prevents fluted, wavy edges. Bend the wires to follow contours and pin only at the ends.
- For speed and manageability, spin out water in a washing machine (spin-only cycle with dry towels) rather than lifting soggy wool.
- Lay flat on dry towels, changing towels as needed until fully dry.
See Free Cardigan Knitting Patterns
The Three Stitches Every Knitter Needs
If you only learn three finishing techniques, make them these:
| Stitch | What It Does | Best For |
|---|---|---|
| Mattress stitch | Invisible vertical seam | Stockinette, full-fashioned edges, raglans |
| Backstitch | Strong, firm seam | Shoulders, sleeve caps, textured stitches |
| Slipstitch crochet | Quick, flexible join | Live stitches, side seams, attaching bands |
No single method works for every situation. What looks perfect on stockinette may fail on garter stitch or lace. The only way to be sure is to swatch first—and build your finishing skills one seam at a time.
Quick Reference: Finishing Order Checklist
Pullovers (Set-In Sleeve):
- [ ] Gauge swatch tested and blocked
- [ ] First shoulder seam
- [ ] Neckband (straight needle/machine method)
- [ ] Second shoulder seam + neckband join
- [ ] Set in sleeves
- [ ] Side seams (hip to armhole) + underarm seams (cuff to armhole)
- [ ] Weave in ends
- [ ] Final block
Raglans:
- [ ] Close three raglan seams
- [ ] Neckband (leave one back seam open if not circular)
- [ ] Close final back seam (if applicable)
- [ ] Side and sleeve seams
- [ ] Weave in ends
- [ ] Final block
Cardigans:
- [ ] All body and sleeve seams complete
- [ ] Front bands attached
- [ ] Buttonholes made
- [ ] Neckband picked up and knit
- [ ] Weave in ends
- [ ] Final block
Bottom Line
Finishing isn’t a punishment—it’s the final 10% that makes your sweater wearable. Start with a good swatch, choose edges that seam well, and rely on mattress stitch, backstitch, and slipstitch crochet to do the heavy lifting. Block with intention, weave in ends neatly, and you’ll never dread the last step again.