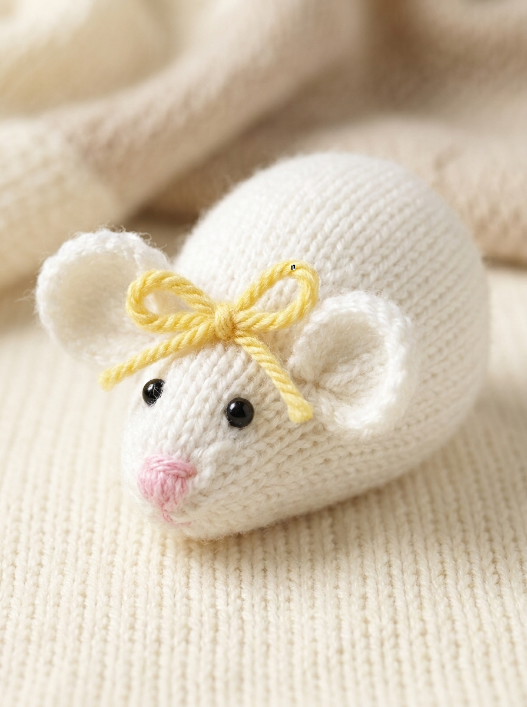
This Little Knitted Mouse is a wonderfully simple toy to make from small amounts of DK yarn. The mouse is knitted flat on two needles, with straightforward shaping creating its plump body and pointed little nose.
Add two knitted ears, a simple tail and embroidered features, and you have a sweet little mouse that’s perfect when you want a small project without complicated toy construction.
It’s also a useful scrap yarn knitting pattern, as you only need oddments of white, black and pink yarn.
Quick Pattern Information
- Pattern: Little Knitted Mouse
- Project: Knitted mouse
- Yarn Weight: DK
- Needles: Straight needles
- Construction: Knitted flat
- Main Stitch: Stocking stitch
- Features: Pointed nose, knitted ears and tail, embroidered face
- Best for: Small amounts of leftover DK yarn
Materials
- Oddments of white, black, yellow and pink DK yarn
- 2.75 mm knitting needles
- Darning needle
- Polyester stuffing
Gauge
Approximately 9 sts and 10 rows to 1 in.
Keep the tension nice and tight so that the stuffing does not show through the knitted fabric.
Abbreviations
k – knit
p – purl
st st – stocking stitch
st – stitch
sts – stitches
inc 1 – increase 1 stitch by knitting into the front and back of the next stitch
k2tog – knit 2 stitches together
Body
Using white yarn, cast on 15 sts.
Row 1: P.
Row 2: Inc 1 in every st to end. 30 sts
Beginning with a purl row, work 15 rows in st st.
Next row: (K4, k2tog) to end. 25 sts
Beginning with a purl row, work 5 rows in st st.
Next row: (K3, k2tog) to end. 20 sts
Beginning with a purl row, work 5 rows in st st.
Next row: (K2, k2tog) to end. 15 sts
Beginning with a purl row, work 5 rows in st st.
Next row: (K1, k2tog) to end. 10 sts
Beginning with a purl row, work 3 rows in st st.
Next row: K2tog to end. 5 sts
Break yarn, leaving a long tail. Thread the yarn through the remaining 5 sts, pull tightly and fasten off.
Join the row ends to form the body. Turn right side out and stuff firmly.
Gather around the cast-on edge, pull tightly to close and fasten off.
Tail
Using white yarn, cast on 30 sts.
Cast off.
Sew the tail securely to the gathered cast-on end of the body.
Ears
Make 2.
Using white yarn, cast on 10 sts.
Row 1: P.
Row 2: K2tog, K6, k2tog. 8 sts
Row 3: P.
Row 4: K2tog, K4, k2tog. 6 sts
Row 5: P.
Row 6: K2tog to end. 3 sts
Break yarn, leaving a long tail. Thread through the remaining 3 sts, pull tightly and fasten off.
Fold the cast-on edge of each ear in half and secure with a few stitches to give the ear its shape.
Position the ears towards the pointed end of the body and sew securely in place.
Face and Finishing
Using black yarn, embroider the eyes between the nose and ears, referring to the finished mouse for placement.
Using pink yarn, embroider a few small stitches over the pointed end of the body to form the nose.
Thread a length of pink yarn beneath the centre stitch between the ears. Tie it into a small bow and secure it to the head.
Knitting Bee Pattern Notes
Best feature: It’s genuinely simple. The main mouse body is one flat piece with straightforward decreases creating the shape.
Best for: Knitters looking for a small toy project on straight needles.
Yarn: DK scraps, making this a useful leftover-yarn project.
Construction: Flat knitting followed by one main body seam.
Make it your own: There’s no reason your mouse has to be white. Grey, brown, cream or even leftover striped yarn could make a completely different little character.
Good to know: Keep your knitting fairly firm. A dense fabric gives a stuffed toy a neater appearance and helps prevent the stuffing showing between stitches.
More Free Mouse Knitting Patterns
Love knitted mice? Find more designs in our collection of free mouse knitting patterns, including tiny mice, dressed character mice and more detailed toys.
For hundreds more animals, dolls and characters, explore our free toy knitting patterns.
You can also browse our top free knitting pattern roundups for more hand-picked collections and ideas for your next project.