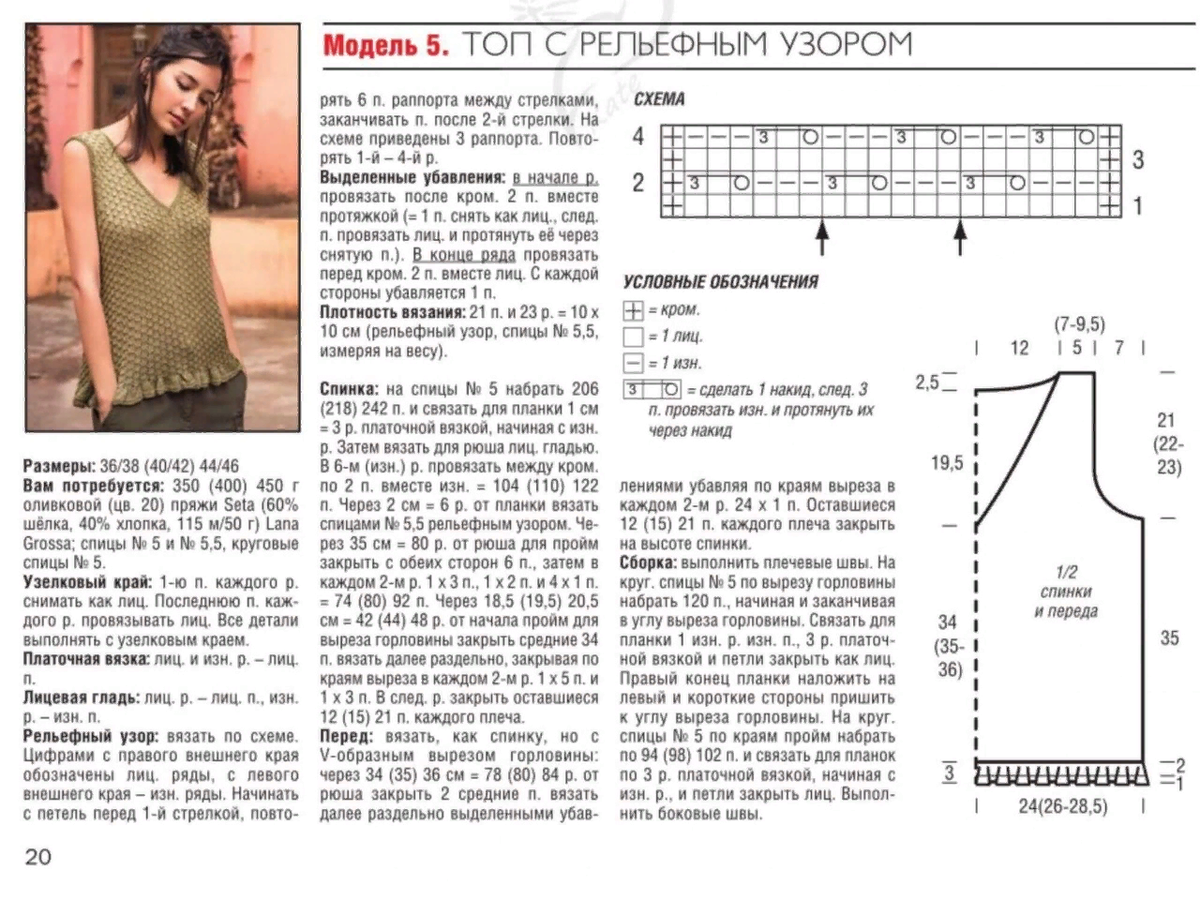
Textured V-Neck Top with Ruffle Hem Free Knit Pattern – This elegant top combines the luxurious softness of silk and cotton with a modern textured design. A subtle ruffle at the hem adds a touch of femininity, while the V-neckline creates a flattering silhouette for all body types. The textured stitch pattern gives depth and interest, making it more than just a basic top.
With carefully placed decreases, the top shapes naturally at the shoulders and neckline, providing a tailored fit without restricting comfort. The garter stitch edges at the hem, neckline, and armholes give the finished piece a polished, professional look.
Perfect for spring and summer, this top pairs effortlessly with jeans, skirts, or tailored trousers. The olive green color highlights the texture beautifully, but the pattern works equally well in soft neutrals, jewel tones, or pastels. Handmade, stylish, and timeless, it’s a piece you’ll reach for season after season.

Sizes
36/38 (40/42) 44/46
Materials
- 350 (400) 450 g olive green yarn Seta by Lana Grossa (60% silk, 40% cotton; 115 m/50 g)
- Knitting needles size 5 mm and 5.5 mm
- Circular needles size 5 mm
Edging
Slip the first stitch of every row knitwise, knit the last stitch of every row. Work all pieces with this selvedge edge.
Stitches
- Garter stitch: Knit all rows.
- Stockinette stitch: Knit on RS, purl on WS.
- Textured pattern: Work from chart.
- Right edge numbers = RS rows, left edge numbers = WS rows.
- Begin with stitches before the 1st arrow, repeat the 6 sts between arrows, end with stitches after the 2nd arrow.
- Chart shows 3 repeats.
- Repeat rows 1–4 throughout.
Shaped Decreases
At the beginning of the row: after the selvedge, slip 1 stitch knitwise, knit 1, pass the slipped stitch over (= decrease 1 st).
At the end of the row: work to the last 3 sts, knit 2 together, work 1 selvedge. (= decrease 1 st).
Gauge
21 sts × 23 rows = 10 × 10 cm in textured pattern with 5.5 mm needles, measured without stretching.
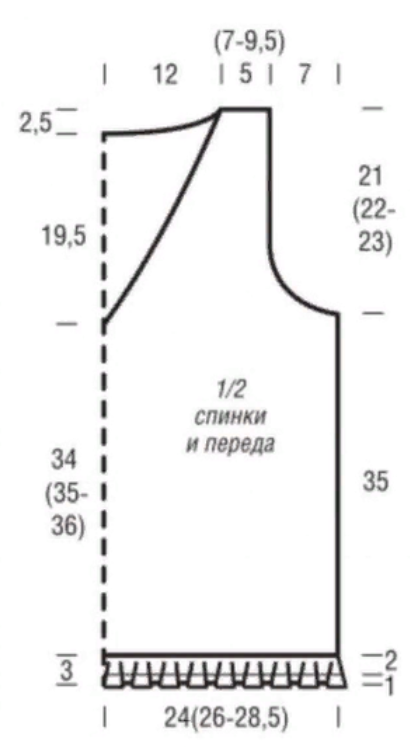
Back
With 5 mm needles, cast on 206 (218) 242 sts.
Work 1 cm = 3 rows in garter stitch, starting with a WS row.
Then for the ruffle, work in stockinette stitch.
In the 6th row (WS), purl 2 sts together across between selvedge sts = 104 (110) 122 sts.
After 2 cm = 6 rows from the ruffle, change to 5.5 mm needles and work in textured pattern.
Armholes:
At 35 cm = 80 rows from the ruffle, bind off at each edge:
- 6 sts once,
- then 3 sts once,
- 2 sts once,
- and 1 st 4 times = 74 (80) 92 sts remain.
Neckline:
At 18.5 (19.5) 20.5 cm = 42 (44) 48 rows from armhole shaping, bind off the center 34 sts.
Finish each side separately, binding off at neckline edge every 2nd row:
- 5 sts once,
- 3 sts once.
Then bind off the remaining 12 (15) 21 sts for each shoulder.
Front
Work as for back, but with V-neck:
At 34 (35) 36 cm = 78 (80) 84 rows from the ruffle, bind off the center 2 sts.
Work each side separately, decreasing 1 st at neckline edge every 2nd row 24 times using the shaped decreases.
Bind off remaining 12 (15) 21 sts for each shoulder at same length as back.
Finishing
Sew shoulder seams.
Neckband:
With circular needles size 5 mm, pick up 120 sts around neckline, beginning and ending at the point of the V-neck.
Work as follows:
- 1 WS row in purl,
- 3 rows in garter stitch.
Bind off all sts knitwise.
Cross right end of neckband over left at V-neck point and sew short edges to neckline.
Armhole bands:
With circular needles size 5 mm, pick up 94 (98) 102 sts around each armhole.
Work 3 rows in garter stitch, starting with a WS row.
Bind off all sts knitwise.
Sew side seams.
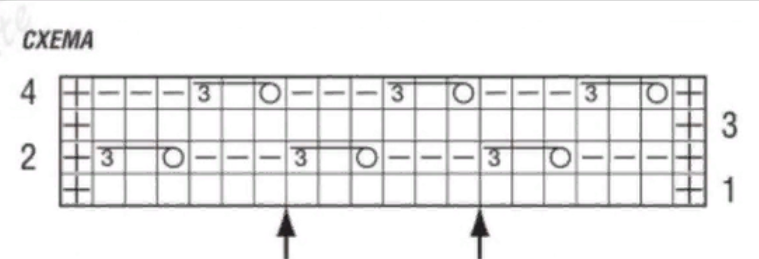
Symbol Key
+(cross in a square) represents a selvage stitch (кром.)- Open square represents a knit stitch (
1 лиц.) - Square with a horizontal line represents a purl stitch (
1 изн.)

make 1 yarn over, knit the next 3 sts purlwise and pull them through the yarn over
NOTE: This is a translation from a Russian Pattern.
Top con escote en V y volante en el bajo
Introducción
Este elegante top combina la suavidad lujosa de la seda y el algodón con un diseño moderno en relieve. Un delicado volante en el bajo aporta un toque femenino, mientras que el escote en V crea una silueta favorecedora para todo tipo de cuerpo. El punto en relieve añade profundidad e interés, transformando este proyecto en mucho más que un básico.
Con disminuciones cuidadosamente ubicadas, el top se moldea de forma natural en los hombros y el escote, logrando un ajuste entallado pero cómodo. Los bordes en punto bobo en el bajo, el escote y las sisas le dan un acabado pulido y profesional.
Perfecto para primavera y verano, este top combina fácilmente con vaqueros, faldas o pantalones de vestir. El color verde oliva resalta el relieve de manera hermosa, aunque el modelo luce igualmente bien en tonos neutros, joya o pasteles. Hecho a mano, elegante y atemporal, es una prenda que usarás temporada tras temporada.
Detalles del patrón
Tallas
36/38 (40/42) 44/46
Materiales
- 350 (400) 450 g de hilo Seta de Lana Grossa en color oliva (60% seda, 40% algodón; 115 m/50 g)
- Agujas rectas de 5 mm y 5,5 mm
- Agujas circulares de 5 mm
Borde de orillo
Deslizar el primer punto de cada vuelta como si se tejiera del derecho, tejer el último punto del derecho. Tejer todas las piezas con este borde de orillo.
Puntos empleados
- Punto bobo: todas las vueltas del derecho.
- Punto jersey: derecho en las vueltas del derecho, revés en las vueltas del revés.
- Punto en relieve: tejer siguiendo el esquema.
- Números a la derecha = vueltas del derecho, a la izquierda = vueltas del revés.
- Empezar con los puntos antes de la 1ª flecha, repetir los 6 puntos entre flechas, terminar con los puntos después de la 2ª flecha.
- El esquema muestra 3 repeticiones.
- Repetir siempre de la 1ª a la 4ª vuelta.
Disminuciones destacadas
Al inicio de la vuelta: después del orillo, deslizar 1 punto como derecho, tejer 1 derecho y pasar el punto deslizado sobre el tejido (= 1 disminución).
Al final de la vuelta: tejer hasta los 3 últimos puntos, 2 puntos juntos del derecho, orillo (= 1 disminución).
Muestra
21 puntos × 23 vueltas = 10 × 10 cm en punto en relieve con agujas de 5,5 mm, medido sin estirar.
Espalda
Con agujas de 5 mm, montar 206 (218) 242 p.
Tejer 1 cm = 3 vueltas en punto bobo, comenzando con una vuelta del revés.
Luego, para el volante, continuar en punto jersey.
En la 6ª vuelta (revés), tejer 2 p. juntos del revés en todo el ancho entre orillos = 104 (110) 122 p.
Después de 2 cm = 6 vueltas desde el volante, cambiar a agujas de 5,5 mm y continuar en punto en relieve.
Sisas:
A 35 cm = 80 vueltas desde el volante, cerrar en ambos lados:
- 6 p. una vez,
- luego 3 p. una vez,
- 2 p. una vez,
- y 1 p. 4 veces = 74 (80) 92 p.
Escote:
A 18,5 (19,5) 20,5 cm = 42 (44) 48 vueltas desde el inicio de las sisas, cerrar los 34 p. centrales.
Continuar cada lado por separado, cerrando en el borde del escote en cada 2ª vuelta:
- 5 p. una vez,
- 3 p. una vez.
Cerrar los 12 (15) 21 p. restantes de cada hombro.
Delantero
Tejer como la espalda, pero con escote en V:
A 34 (35) 36 cm = 78 (80) 84 vueltas desde el volante, cerrar los 2 p. centrales.
Continuar cada lado por separado, disminuyendo 1 p. en el borde del escote en cada 2ª vuelta 24 veces.
Cerrar los 12 (15) 21 p. restantes de cada hombro a la misma altura que la espalda.
Acabado
Cerrar las costuras de los hombros.
Tira del escote:
Con agujas circulares de 5 mm, recoger 120 p. alrededor del escote, comenzando y terminando en la punta del escote en V.
Tejer de la siguiente manera:
- 1 vuelta del revés en punto revés,
- 3 vueltas en punto bobo.
Cerrar todos los puntos del derecho.
Cruzar el extremo derecho de la tira sobre el izquierdo en la punta del escote en V y coser los bordes cortos al escote.
Tiras de sisa:
Con agujas circulares de 5 mm, recoger 94 (98) 102 p. alrededor de cada sisa.
Tejer 3 vueltas en punto bobo, comenzando con una vuelta del revés.
Cerrar todos los puntos del derecho.
Cerrar las costuras laterales.
Топ с V-образным вырезом и воланом по низу
Описание
Этот элегантный топ сочетает в себе роскошную мягкость шёлка и хлопка с современным рельефным узором. Нежный волан по низу придаёт модели женственность, а V-образный вырез формирует изящный силуэт, подходящий для любой фигуры. Рельефный узор создаёт глубину и фактуру, превращая изделие в стильную и универсальную вещь.
Благодаря аккуратно выполненным убавкам топ плавно формируется в области плеч и выреза, обеспечивая приталенный, но при этом комфортный крой. Планки платочной вязкой по низу, вырезу и проймам придают модели аккуратный и профессиональный вид.
Идеальный вариант для весны и лета — топ прекрасно сочетается с джинсами, юбками или брюками. Оливковый цвет подчёркивает красоту узора, но модель будет не менее эффектно выглядеть и в нейтральных, и в пастельных оттенках, а также в насыщенной гамме. Ручная работа делает эту вещь не только стильной, но и по-настоящему уникальной.
Размеры
36/38 (40/42) 44/46
Материалы
- 350 (400) 450 г оливковой пряжи Seta от Lana Grossa (60% шёлка, 40% хлопка, 115 м/50 г)
- Спицы № 5 и № 5,5
- Круговые спицы № 5
Край с узелками
В начале каждого ряда 1 п. снимать как лиц., последнюю петлю каждого ряда вязать лицевой. Все детали вязать с таким краем.
Узоры
- Платочная вязка: все ряды лицевыми.
- Лицевая гладь: лицевые ряды – лиц., изнаночные – изн.
- Рельефный узор: вязать по схеме.
- Цифры справа – лиц. ряды, слева – изн. ряды.
- Начинать с петель до 1-й стрелки, повторять 6 п. раппорта между стрелками, заканчивать петлями после 2-й стрелки.
- На схеме приведено 3 раппорта.
- Повторять 1–4-й ряды.
Выделенные убавки
В начале ряда: после кромочной 1 п. снять как лиц., 1 лиц., протянуть её через снятую петлю (= убавка).
В конце ряда: провязать 2 п. вместе лиц., затем кромочная (= убавка).
Плотность вязания
21 п. × 23 р. = 10 × 10 см рельефным узором, спицы № 5,5 (измерять без натяжения).
Спинка
На спицы № 5 набрать 206 (218) 242 п.
Провязать 1 см = 3 р. платочной вязкой, начиная с изн. ряда.
Далее для волана вязать лицевой гладью.
В 6-м ряду (изн.) провязать между кром. по 2 п. вместе изнаночными = 104 (110) 122 п.
Через 2 см = 6 р. от волана перейти на спицы № 5,5 и вязать рельефным узором.
Проймы:
Через 35 см = 80 р. от волана закрыть с обеих сторон:
- 1 раз по 6 п.,
- 1 раз по 3 п.,
- 1 раз по 2 п.,
- 4 раза по 1 п. = 74 (80) 92 п.
Горловина:
Через 18,5 (19,5) 20,5 см = 42 (44) 48 р. от начала пройм закрыть средние 34 п.
Оставшиеся петли разделить и вязать раздельно, закрывая с обеих сторон выреза в каждом 2-м ряду:
- 1 раз 5 п.,
- 1 раз 3 п.
Закрыть оставшиеся 12 (15) 21 п. плеча.
Перед
Вязать, как спинку, но с V-образным вырезом:
Через 34 (35) 36 см = 78 (80) 84 р. от волана закрыть средние 2 п.
Далее вязать раздельно, выполняя выделенные убавки по краям выреза в каждом 2-м р. 24 раза по 1 п.
Закрыть оставшиеся 12 (15) 21 п. каждого плеча на высоте спинки.
Сборка
Выполнить плечевые швы.
Планка горловины:
На круговые спицы № 5 набрать 120 п. по вырезу горловины, начиная и заканчивая в углу V-образного выреза.
Провязать:
- 1 изн. ряд изнаночными,
- 3 р. платочной вязкой.
Закрыть все петли лицевыми.
Правый конец планки наложить на левый и пришить короткие стороны к углу выреза.
Планки пройм:
На круговые спицы № 5 набрать по краям каждой проймы 94 (98) 102 п.
Провязать 3 р. платочной вязкой, начиная с изн. ряда.
Закрыть все петли лицевыми.
Выполнить боковые швы.
Leave a Reply