This knitted butterfly pattern creates a delicate three-dimensional butterfly with shaped upper and lower wings, a small garter-stitch body and optional bead details. The wings are knitted separately and assembled around the body, with simple lace increases and decreases creating their scalloped, butterfly-like shape.
Measuring approximately 10cm (4in) across, this little knitted butterfly makes a beautiful handmade decoration or ornament. Make it in white for a delicate lace-like look, or experiment with colourful yarns for butterflies to use as embellishments and decorative motifs.
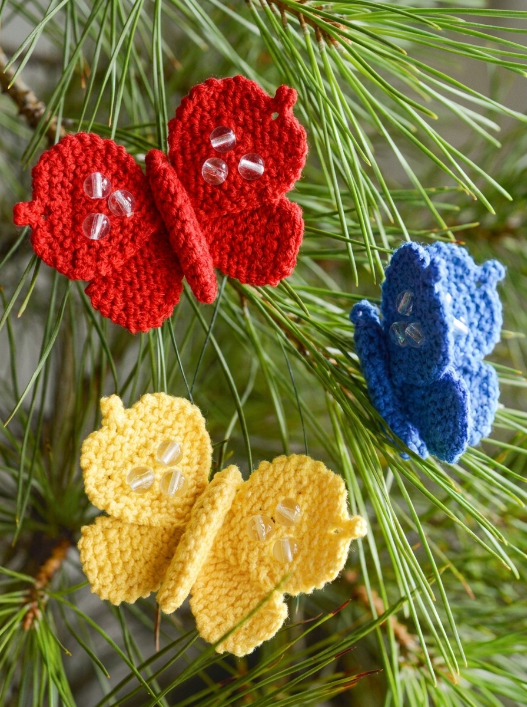
Finished Size
Approximately 10cm / 4in across.
Materials
- Cotton yarn suitable for the required gauge
- 2.75mm (US 2) knitting needles
- Small round beads
- Fine florist’s wire
- Spray starch
- Sewing needle
- Sewing thread
The original pattern uses DMC Natura Just Cotton, a 100% cotton yarn.
Gauge
25 sts = 10cm / 4in over garter stitch, using 2.75mm needles and measured after pressing.
Abbreviations
- k: knit
- st(s): stitch(es)
- gst: garter stitch – knit every row
- yo: yarn over
- k2tog: knit 2 stitches together
- ssk: slip 1 knitwise, slip the next stitch knitwise, return both stitches to the left needle and knit them together through the back loops
- bd1: bead 1
Before You Begin
The butterfly is made from:
- 2 upper wings
- 2 lower wings
- 1 body
When casting on and casting off, leave yarn tails long enough to use when sewing the butterfly together.
Upper Wings
Make 2.
Thread 3 beads onto the yarn before beginning.
Cast on 5 sts.
Work 4 rows in garter stitch.
Row 5: k1, yo, k3, yo, k1. 7 sts.
Row 6 and every following alternate row: knit, working each yarn over through the back loop.
Row 7: knit.
Row 9: k1, yo, k5, yo, k1. 9 sts.
Row 11: knit.
Row 13: k1, yo, k7, yo, k1. 11 sts.
Row 15: k5, bd1, k5.
On the wrong-side rows, work each beaded stitch through the back loop.
Row 17: k1, yo, k9, yo, k1. 13 sts.
Row 19: k4, bd1, k3, bd1, k4.
Row 21: k1, k2tog, k7, ssk, k1. 11 sts.
Row 23: k1, k2tog, k5, ssk, k1. 9 sts.
Row 25: k1, k2tog, k3, ssk, k1. 7 sts.
Row 26 (WS): cast off 3 sts, transfer the remaining stitches from the right-hand needle to the left-hand needle, cast on 2 sts, then cast off 6 sts.
Make the second upper wing in the same way.
Lower Wings
Make 2.
Cast on 2 sts.
Work 2 rows in garter stitch.
Row 3: k1, yo, k1. 3 sts.
Row 4 and every following alternate row: knit, working each yarn over through the back loop.
Row 5: knit.
Row 7: k1, (yo, k1) twice. 5 sts.
Row 9: knit.
Row 11: k1, yo, k3, yo, k1. 7 sts.
Row 13: knit.
Row 15: k1, yo, k5, yo, k1. 9 sts.
Row 17: k1, k2tog, k3, ssk, k1. 7 sts.
Row 19: k1, k2tog, k1, ssk, k1. 5 sts.
Row 20 (WS): cast off knitwise.
Make the second lower wing in the same way.
Body
Cast on 12 sts.
Work 6 rows in garter stitch.
Cast off.
Making Up the Butterfly
Fold the body lengthways and join the cast-on and cast-off edges.
Join the cast-on edges of each pair of upper wings and then each pair of lower wings.
Position the lower wings underneath the upper wings and secure them together.
Attach the body to the underside of the wings.
Make a small stitch around the body near the top to suggest the butterfly’s head.
If using beads, take care not to press directly onto them during finishing.
Spray the wings lightly with starch, wipe any starch from the beads and allow the butterfly to dry flat.
For antennae, thread a length of fine florist’s wire through stitches on the wrong side of the upper wings. Twist the ends closed and trim to the desired length.
Helpful Knitting Notes
The wings are worked mainly in garter stitch, which gives the butterfly a softly textured surface and helps the small pieces hold their shape.
An unusual feature of this pattern is that the yarn overs on the following wrong-side rows are worked through the back loop. This closes the yarn overs rather than leaving conventional lace eyelets, so they function as shaping increases while maintaining a more solid fabric.
The upper wings grow from 5 stitches to 13 stitches before being shaped back down. The lower wings grow from 2 stitches to 9 stitches before decreasing towards their tips.
The beads are optional. Leaving them out will not affect the shaping of the knitted butterfly.
Cotton is particularly suitable for this project because it responds well to starching and gives the finished wings enough structure to hold their shape.